
There are some apps that only work on macOS. Some Windows users may want to use the Mac apps for work or personal purposes. But the question is, how to run Mac apps on Windows? You may ask, what should you do to access Mac operating system inside your Windows PC? The answer is virtualization.
Virtualization is a method that enables you to install macOS on a Windows computer. After installing, you can use the OS seamlessly, as you would normally do on a physical Mac device. Furthermore, another advantage of this approach is that you can run both Windows and Mac operating systems simultaneously.
Here you will learn how to run Mac apps on Windows using a virtualization program developed by VMware.
VMware is a company that is dedicated to producing virtualization solutions and the Workstation is one of them. VMware Workstation comes in two variants, namely:
· Workstation Pro
Workstation Pro has some advanced features but it is a paid program.
· Workstation Player
Workstation Player lacks a few options such as capturing snapshots (virtual machine states), virtual machine encryption, etc. Nevertheless, Player is free software and it is mostly used by students and organizations for educational and testing purposes respectively. Also, the process of installing macOS on Workstation Pro and Workstation Player is identical.
Notes:
1. VMware Workstation Player is used here for demonstration.
2. Before installing macOS you must first obtain an installation media in ISO format. You can conduct an online search to find and download the file.
Preparation to Run Mac Apps on Windows
VMware Workstation apps are all good, alright! However, there’s a catch. Neither Workstation Pro nor Workstation Player natively support macOS. To install Mac OS on virtual machines created in either of these variants, you must use a third-party tool called ‘Unlocker’. When executed, ‘Unlocker’ adds the option for Mac to the list of supported operating systems. In short, you need three things, namely:
1. VMware Workstation (Pro or Player)
Link: https://www.vmware.com/products/workstation-player.html
2. Installation Media for macOS (.ISO Format)
Please conduct an online search to obtain the file from a reliable source.
3. Unlocker for macOS
Link: https://github.com/DrDonk/unlocker/releases/tag/v4.2.3
Once you have all the ingredients in place, you can follow the steps given below to learn how to run Mac apps on Windows after installing macOS on VMware Workstation.
Steps on How to Run Mac Apps on Windows
This is not a very simple process. We do our best to offer a detailed guide, so it will be easy to follow.
Step 1: Install VMware Workstation and Run Unlocker
Use your favorite web browser to download VMware Workstation Player. Once obtained, use the regular method to install the software on your PC.

Next, use your preferred ZIP extractor tool to unzip the unlocker423.zip file (this is the latest version at the time of this writing) and go to the unlocer423 > windows folder. Right-click the unlock.exe file and click Run as administrator from the context menu.
Click More info on the Windows protected your PC screen if it appears, and click Run anyway. Click Yes on the User Account Control confirmation box and wait while Unlocker runs and does its work.

Once the process is complete, press Enter on your keyboard to exit the command prompt.

Step 2: Create a New Virtual Machine
Launch VMware Workstation Player, ensure that the Use VMware Workstation 16 Player for free for non-commercial use radio button is selected, and click Continue. On the next screen, click Finish.

On the next window, click Create a New Virtual Machine.

On the New Virtual Machine Wizard box, click to select the I will install the operating system later radio button, and click Next.

On the next screen, click to select the Apple Mac OS X radio button, and choose your preferred macOS version from the Version drop-down list (macOS 13 is selected here for demonstration). Click Next to continue.

On the Name the Virtual Machine screen, give a name to your virtual machine or leave the default one intact. Optionally, click Browse to define your preferred location to save the virtual machine. Click Next to proceed to the next step.

On the Specify the Disk Capacity screen, define your preferred size for the virtual hard drive in the Maximum disk size (GB) field or leave the default size unchanged. Click to select the Store virtual disk as a single file radio button, and click Next.

Note: You can also choose to split the virtual disk into multiple files but in that case, it would be tedious to move the VM to a different location when/if needed.
On the next screen, review the specifications of the virtual machine you are about to create, and if everything looks fine, click Finish. Optionally, you can click Customize Hardware if you want to make any changes to the virtual hardware assigned to the virtual machine.

Step 3: Prepare Virtual Machine for macOS Installation
On the next screen, click Edit virtual machine settings from the bottom of the right pane.

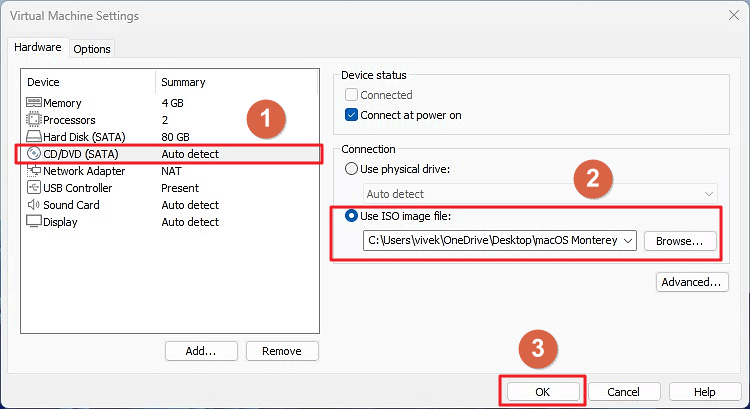
On the Virtual Machine Settings box, click to select CD/DVD (SATA) from the left pane. From the right, click choose the Use ISO image file radio button from the Connection section. Next, click Browse and select the macOS installation ISO file that you obtained earlier. Click OK when done.
Now, close VMware Workstation Player and exit it from the System Tray as well. Go to the folder where you saved the virtual machine, right-click the file with the *.vmx extension (it usually has the name of the virtual machine that you specified earlier), and open it with Notepad.

Scroll down to the bottom of the written lines and add the following code at the end:
smbios.reflectHost = “TRUE”
hw.model = “MacBookPro14,3”
board-id = “Mac-551B86E5744E2388”
smc.version = “0”
After this, go to File, click Save, and close the Notepad file. Now, launch VMware Workstation Player again, and move to the next step.

Step 4: Begin macOS Installation
Back on the main screen, from the left pane, click to select the virtual machine you created, click Play virtual machine from the right, and follow the on-screen instructions to use Disk Utility to create a partition and install macOS on VMware Workstation Player.

Once installed, you can boot the virtual machine and safely run Mac apps on Windows.
Conclusion
You can use any virtualization program that is available online. While VMware is quite popular as it develops solutions for home users and corporates, many other vendors produce dedicated applications specific to certain usage types, i.e., businesses or homes. Nevertheless, the method explained above on how to run Mac apps on Windows works on a common principle, regardless of the virtualization software you pick.


